Views: 37 Author: Pretank Marketing Team Publish Time: 2024-04-03 Origin: Site


1.Introduction:
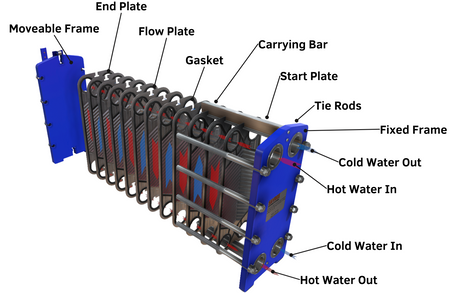
Plate heat exchangers play a crucial role in various industrial processes and HVAC systems by efficiently transferring heat from one fluid to another. They consist of multiple thin, corrugated metal plates stacked together and sealed with gaskets. The design creates a large surface area for heat transfer while maintaining a compact size.
The importance of plate heat exchangers lies in their ability to facilitate heat exchange with high efficiency and minimal energy consumption. They are commonly used in applications such as heating, ventilation, air conditioning, refrigeration, power generation, and chemical processing. By efficiently transferring heat between fluids, plate heat exchangers help maintain optimal operating temperatures, improve energy efficiency, and reduce operating costs.
However, over time, plate heat exchangers can accumulate deposits, such as scale, rust, and biological fouling, which can significantly impair their performance. These deposits reduce heat transfer efficiency, increase energy consumption, and may lead to system downtime and maintenance issues. Therefore, regular cleaning and maintenance of plate heat exchangers are essential to ensure their optimal performance and longevity.
Proper cleaning methods vary depending on the type of deposits and the specific application. Techniques may include chemical cleaning, mechanical cleaning, or a combination of both. Regular inspection and cleaning schedules should be established to prevent the buildup of deposits and maintain the efficiency of plate heat exchangers.

2.Collect the required cleaning tools and materials
Cleaning Solvents: Choose appropriate solvents based on the type of deposits to be removed. Common options include acidic, alkaline, or enzymatic cleaners. Ensure compatibility with the materials of construction of the plate heat exchanger.
Brushes: Select brushes suitable for reaching and scrubbing the intricate spaces between the plates. Brushes with nylon bristles are often preferred to avoid damaging the plates.
Personal Protective Equipment (PPE): Wear appropriate PPE such as gloves, goggles, and protective clothing to ensure safety when handling cleaning solvents and operating in potentially hazardous environments.
Safety Equipment: Ensure availability of any necessary safety equipment such as spill containment materials, ventilation systems, and first aid supplies.
Reviewing Manufacturer Guidelines: Refer to the manufacturer's instructions and guidelines for cleaning the specific model of plate heat exchanger. These instructions may provide recommendations on cleaning procedures, compatible cleaning agents, and safety precautions.
Preparing the Cleaning Solution: Prepare the cleaning solution according to the manufacturer's recommendations or established industry practices. Follow proper dilution ratios and safety precautions when handling concentrated cleaning agents.
Setting Up Work Area: Choose a well-ventilated area with adequate space and lighting for performing the cleaning procedure. Lay down protective covers or absorbent materials to prevent spills and minimize environmental impact.
Shutdown and Isolation: Shut down the plate heat exchanger and isolate it from the rest of the system to ensure safety during cleaning. Follow proper lockout/tagout procedures to prevent accidental startup.
By following these steps and adhering to safety protocols, you can effectively prepare for the cleaning of a plate heat exchanger, ensuring optimal performance and longevity.
3.basic steps for cleaning a plate heat exchanger
1)Power Off and Drainage:
1.Turn off the power to the plate heat exchanger and corresponding pipelines to ensure safe operation.
2.Safely discharge any residual liquids or gases to prevent accidents.
2)Disassembly:
The initial step in maintaining the heat exchanger involves the disassembly of the plate heat exchanger, a task that necessitates skilled mechanics to shut off all fluid inflows and outflows from the heat exchanger, ensuring strict adherence to lockout procedures.
Before attempting to remove fluid from the heat exchanger, it's crucial to release all built-up pressure by opening the valve. It's advisable to allow the heat exchanger to cool down completely prior to commencing the disassembly process.
To safely disassemble the heat exchanger, begin by gradually loosening the bolts securing the casing, loosening each bolt about a quarter of a foot at a time. It's important to exercise caution to avoid over-loosening the bolts, as this could potentially damage the bolt heads.
Once the bolts are removed, carefully slide each removable head back to expose the hot plate pack within. For ease of reinstallation, it's recommended to number each plate in reverse order and ensure that the corresponding number is clearly marked on the top of each plate.
3)Cleaning the Plates:
Begin by removing the gasket. Assess its condition to determine if it can be reused. Simply pinch the gasket to gauge its integrity. For gaskets slated for reuse, wash them meticulously with soap and water, then hang them in a clean, dry area.
If there's any loose debris present on the plates, it's imperative to clean them using a combination of soap, water, and a soft brush or pressure washer. Avoid abrasive tools like grinders or hard brushes to prevent damage to the plates.
Clean each plate diligently until all debris is entirely removed, ensuring optimal heat transfer efficiency.
Pay special attention to the grooves of the gaskets. In severe cases where stubborn adhesives and buildup are present, hot acid and caustic solutions may be necessary to break them down effectively.
During the inspection process, it's imperative to thoroughly examine the plates for cracks and pinholes across the entire facility.
Conduct a visual inspection of the heat exchanger, focusing keenly on areas where the plates make contact with each other. Utilizing lights can enhance the visibility for this inspection, ensuring defects are easily identified.
To further ensure comprehensive examination, consider performing a dye test. This test helps detect any pinholes that may have been missed during the visual inspection. If more than 10% of the plate set exhibits defects, replacement of the plates becomes necessary. However, if the plates pass the dye test, they can undergo cleaning and be reinstated for service.
5)Reassembly and Testing:
Reinstall the cleaned plate heat exchanger back into its original position, ensuring secure connections.
Restart the plate heat exchanger and conduct testing to ensure it operates correctly, including checking pressure, temperature, and flow parameters.
Following these steps ensures the effective cleaning of the plate heat exchanger, maintaining its efficiency and reliability over time.
1) Ensure that operating conditions, including temperature and flow rate, adhere to design specifications.
2) During startup, properly vent the heat exchanger while gradually opening and closing valves to avoid pressure fluctuations and water hammer.
3) Employ upstream filters and screens to remove particulate debris and safeguard the heat exchanger.
4) Conduct daily checks for any variations in temperature, pressure, or signs of external leaks.
5) Regularly maintain clean and well-lubricated fastening bolts.
6) Implement condition monitoring technologies to avoid the need for opening the plate heat exchanger for inspection.
7) Utilize Clean-in-Place (CIP) methods to clean the heat exchanger on-site, avoiding the necessity of opening it for cleaning.
8) Always keep spare equipment clean and dry. If the heat exchanger is taken out of service, flush it with clean water and fully drain it.
9) Shield the heat exchanger from water splashes and exposure to UV radiation and ozone typically generated by power sources.
10) Use only genuine OEM parts for the plate heat exchanger to ensure equipment performance, reliability, and longevity. Additionally, stock critical spare parts and follow storage instructions.
In summary, plate heat exchangers are indispensable components in various industrial processes and HVAC systems, efficiently transferring heat between fluids to maintain optimal operating conditions.
Prettech Design, test and manufacture wide ranges of heat exchanger. Browse Products!
However, the accumulation of deposits over time can impair their performance, making regular cleaning and maintenance essential. By following a systematic approach, including gathering the necessary tools and materials, powering off and draining the system, disassembling, cleaning, rinsing, inspecting, and reassembling the heat exchanger, one can ensure its longevity and efficiency. Additionally, implementing routine maintenance tips such as monitoring operating conditions, employing upstream filters, conducting regular checks, and using genuine OEM parts further enhances performance and reliability. Overall, proper maintenance practices are crucial for maximizing the efficiency and lifespan of plate heat exchangers, ultimately reducing operating costs and minimizing downtime.